I don’t always lug my DSLR around with me, but I almost always have my old iPhone 4S on hand. I’ve often commented at how amazed I am by the image quality from such an antiquated mobile device. Recently a friend was asking how I got my images to come out so great from the iPhone, so I thought I would share with everyone with a short blog post covering everything from taking the photo to post production on device.
Apps:
- Camera (built-in iOS camera app) | alternatively, but I rarely use anymore: Camera+
- Photoshop Express (free!) | theoretical alternative would have been Lightroom mobile, but on my iPhone 4S it’s so slow it’s unusable, and I get most of the features I need from Photoshop
- totally optional – for posting/sharing, I use Instagram which I’ve further linked to auto-post to Facebook, Flickr, Twitter, Tumblr, and Foursquare. Yeah, sorry, all those friends who think I actually log into my Facebook account, think again.
Workflow: Taking the photo
This part is pretty straight forward – I just follow the rule of thirds as much as I can and I take a lot of photos – practice really makes a difference. Hold the device as steady as possible – the closer you are being a human tripod, the closer your images will be to being tack sharp. In contrast, any shake you introduce it going to blur your photos. Oh, and I cheat – I enable the grid on the camera display.


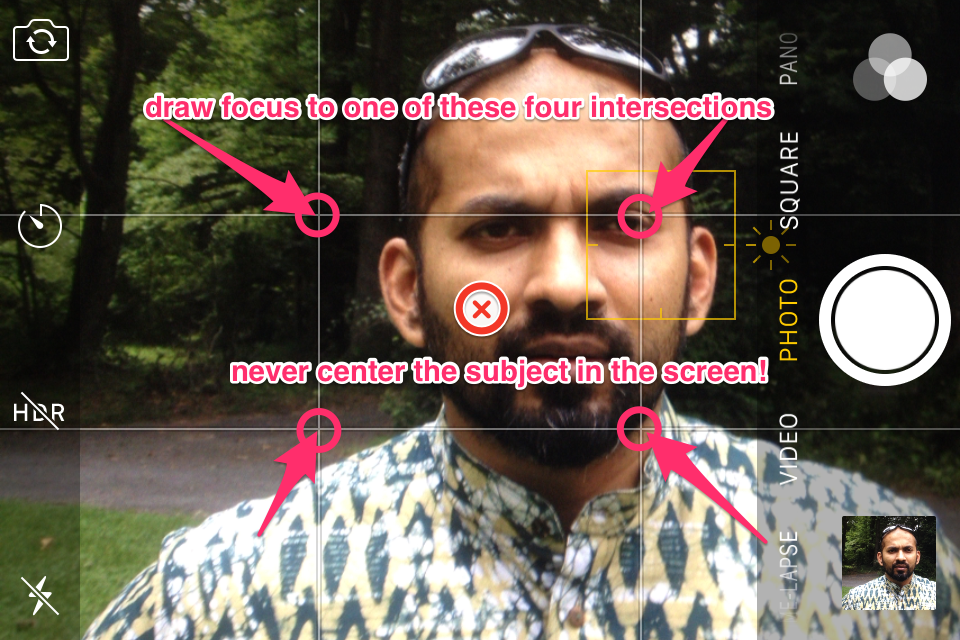
Basically the rule of thirds says to split up the scene by drawing two vertical and two horizontal lines. The four intersections of those lines are the points of interest – that is where you want to line up with the subject in your composition. In my case, when I’m taking a portrait I try to put one of the centers of the subject’s eye in one of those intersections. The worst thing you can do – and also what most people tend to do – is center the subject in the frame. That makes for the most boring of all possible photos. So, since most people take boring photos, following this simple rule will instantly raise the level of your photography (mobile or otherwise).

99% of the time these days I just use the built-in Camera app on my iPhone. I usually leave the HDR setting off, because taking HDR on my old phone takes more time, which allows much more opportunity for camera shake to be introduced. Also my style is to take candid photos, and that’s a lot harder to do if you have to ask the subject to stand perfectly still while your phone takes it’s time to snap the photo. I used to also use an app called Camera+ – it’s nice because it gives you a lot more manual control when you are taking the photo, but updates in iOS like being able to change the exposure just by dragging up on the screen (on that little sun icon next to the focus lock) has made using Camera+ unnecessary.
Workflow: Processing the photo (Photoshop Express)
Once I’ve taken the shot, I process it in Photoshop Express right on my iPhone. I use the manual settings and quickly apply a number of adjustments. Other than the last adjustment (noise reduction), these are in no particular order. With all adjustments, you want to be careful not to add too much, and just how much you adjust is something you need to figure out on your own over time. At the end I’ve included a screen capture video from the app to demonstrate the effect of each adjustment additively. The video was made from the app running on an iPad air – the main difference is the processor on the iPad is much faster and so there is less waiting.
- clarity – for objects, I increase this, for people / portraits I decrease.
- vibrance – increase for more color pop. At the extreme it will start to introduce a color shift and/or fringing so beware.
- shadows – reducing shadows brings out a surprising amount of additional detail in your photo. On portraits it removes shadows on the face (like under the eyes) which is usually quite flattering.
- highlights – I generally reduce these, especially after brightening up the photo overall with shadow reduction.
- sharpen – this makes the photo much more crisp. It also introduces noise, the more you sharpen the more noise you get; noise reduction helps compensate for that.
- The one adjustment I paid for, and I feel that it’s well worth it, is the Noise reduction filter. That is always the last adjustment that I apply.